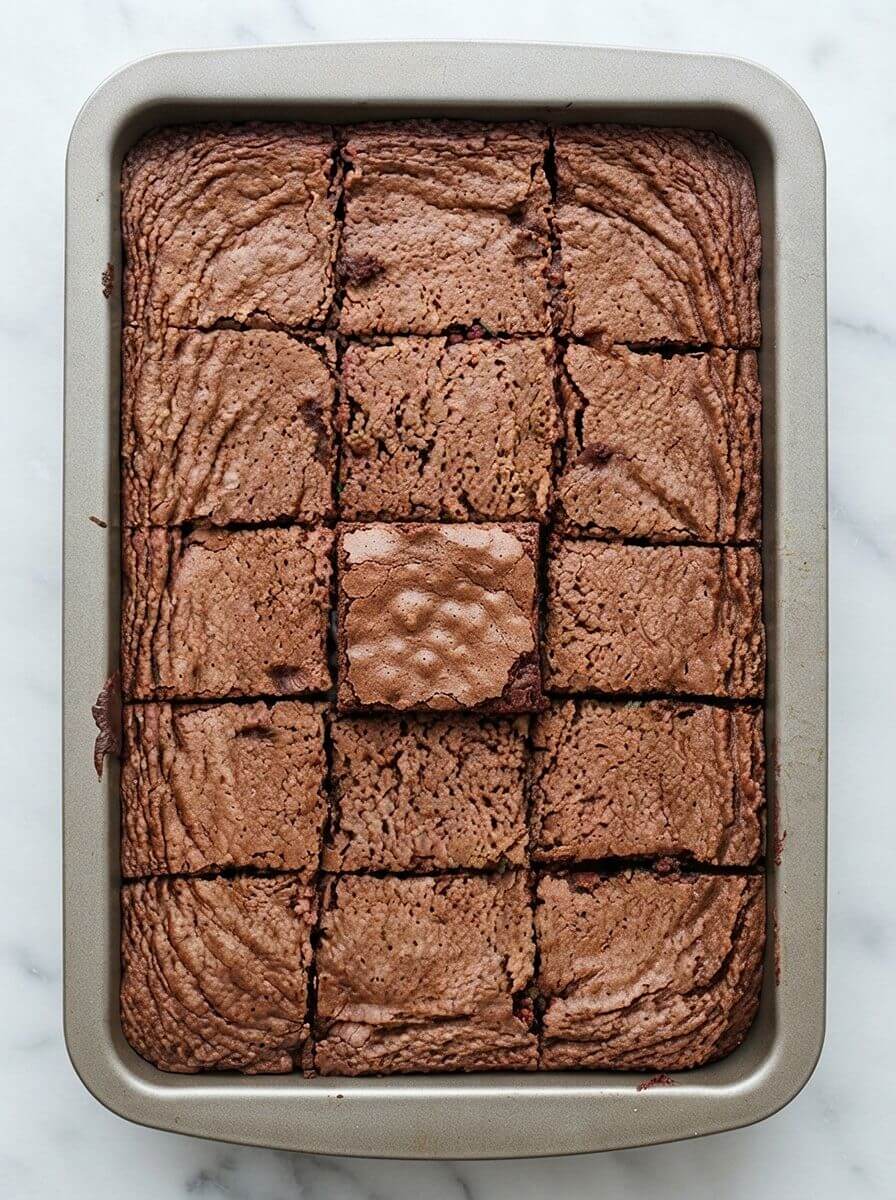
These Absolutely Best Brownies are the kind of old-fashioned chocolate treat worth keeping in your recipe box. They have a moist, fudgy center with just enough cake-like lift, lightly crisp edges, and a deep cocoa aroma that fills the kitchen while they bake. Dutch-processed cocoa gives them an especially smooth, rich chocolate flavor, while melted butter keeps the crumb tender.
I especially like how practical this recipe is. There is no mixer, no melted chocolate, and only about 5 minutes of prep before the pan goes into the oven. The optional walnuts add a buttery crunch, but I often leave part of the batch plain when serving kids. For a denser, less cake-like brownie, all-purpose flour can replace the self-rising flour with the adjustments noted below.
Love this recipe? Pin it to your Dessert board on Pinterest so you don’t lose it!
Ingredients
1 cup granulated sugar
½ cup unsalted butter, melted
2 large eggs
½ cup self-rising flour
⅓ cup unsweetened Dutch-processed cocoa powder
¼ tsp salt
1 tsp vanilla extract
½ cup walnuts, chopped (Optional)
Instructions
- Preheat the oven. Heat the oven to 175°C / 350°F. Grease and lightly flour an 8-inch or 9-inch square baking pan.
- Mix the wet ingredients. Whisk the sugar and melted butter together in a medium bowl until thoroughly combined. Add the eggs and whisk until the mixture looks smooth and slightly glossy.
- Add the dry ingredients. In a separate bowl, combine the self-rising flour, cocoa powder, and salt. Fold the dry mixture into the wet ingredients just until no obvious streaks of flour remain.
- Finish the batter. Stir in the vanilla. Fold in the chopped walnuts, if using. Avoid excessive mixing once the flour has been incorporated.
- Fill the pan. Spread the batter evenly in the prepared baking pan, making sure it reaches the corners.
- Bake. Bake at 175°C / 350°F for 25-30 minutes, until the edges are set and the center is cooked but still moist. Avoid waiting for the center to become completely dry.
- Cool and slice. Let the brownies cool in the pan before cutting into 12 squares. Cooling gives the crumb time to set and produces cleaner slices.
Cooking Notes
Dutch-processed cocoa is particularly good here because its mellow acidity creates a smooth, dark chocolate flavor.
For brownies that lean denser and less cake-like, substitute ½ cup all-purpose flour plus ¾ tsp baking powder for the self-rising flour. Because self-rising flour formulations vary, this substitution is approximate.
Do not overmix after adding the flour. Excessive mixing encourages gluten development and can make brownies tougher.
Check the brownies at 25 minutes, particularly when using a 9-inch pan. A toothpick inserted near the center should show moist crumbs rather than completely wet batter.
For especially clean squares, cool the brownies completely before slicing and wipe the knife between cuts.
Nutrition
The recipe yields 12 servings, with one brownie as the recommended serving. The baked batch should weigh approximately 22-24 oz, depending on moisture loss during baking and whether walnuts are included.
Estimated Nutrition per Serving
- Calories: 200 kcal
- Fat: 12.0 g
- Carb: 23.0 g
- Protein: 3.0 g
Nutrition is an estimate and will vary with the cocoa, butter, flour, and walnuts used.
Recipe Science
These brownies combine melted butter, sugar, eggs, cocoa, and self-rising flour into a simple cocoa-based batter. Unlike brownies made with melted chocolate, cocoa powder supplies concentrated chocolate flavor without introducing additional cocoa butter. Self-rising flour contributes both flour and leavening, producing the recipe’s characteristic cake-like lift while retaining a moist center.
The melted butter supplies fat for tenderness and carries cocoa’s fat-soluble flavor compounds, while eggs provide structure and emulsification. Sugar contributes sweetness but also helps retain moisture and promotes the delicate crust on the surface. Limiting mixing after the flour is introduced reduces unnecessary gluten development, helping prevent a tough texture. The relatively short 25-30 minute baking period also protects the moist interior.
These brownies work well for everyday baking because the batter requires no specialized equipment. Once completely cooled, store them tightly covered at room temperature for about three days, or freeze individual portions for longer storage. Walnuts can be omitted or replaced with pecans.
Dietary Notes & Health Alerts: Based on the supplied nutrition information, saturated fat is approximately 6 g per serving, or 30% of the FDA Daily Value of 20 g, which qualifies as High. Sodium, at approximately 181 mg per serving, is below the 20% Daily Value threshold. Using fewer walnuts will not substantially reduce saturated fat; reducing some of the butter would have a greater effect, although it will also change the brownie texture.
Why You’ll Love This Recipe
- Ready in About 30 Minutes: Five minutes of prep makes these brownies especially convenient when you need a homemade dessert quickly.
- Deep Cocoa Flavor: Dutch-processed cocoa creates a rich chocolate profile without requiring chocolate bars or chips.
- One-Bowl Friendly: The straightforward batter means minimal equipment and easy cleanup.
- Easy to Customize: Keep them plain, add walnuts, substitute pecans, or fold in chocolate chips.
- Great Texture: The combination of melted butter and self-rising flour produces a moist center with a little more lift than a traditional ultra-dense brownie.
FAQ
- Can I use regular unsweetened cocoa powder? Yes. Natural cocoa will work, although the flavor may be slightly sharper and less mellow than Dutch-processed cocoa.
- Can I use all-purpose flour instead? Yes. For a similar amount of lift, use ½ cup all-purpose flour with approximately ¾ tsp baking powder. For a denser brownie, reduce or omit the added leavening.
- Why did my brownies turn out dry? Overbaking is the most common cause. Begin checking at 25 minutes and remove the pan when the center is set but still produces moist crumbs on a toothpick.
- Can I make these ahead? Absolutely. Let them cool completely, cover tightly, and keep them at room temperature for up to about three days.
- Can I freeze the brownies? Yes. Wrap individual cooled brownies well and freeze them in an airtight container. Thaw at room temperature before serving.
Conclusion
These easy cocoa brownies prove that a dependable homemade dessert doesn’t need a long ingredient list or complicated technique. Cooking and baking are always a little personal, so don’t hesitate to adjust the nuts, chocolate intensity, or texture until the recipe feels like your own.
Do you prefer your brownies plain, packed with walnuts, or loaded with chocolate chips? I’d love to hear what you choose. Happy baking!

Absolutely Best Fudgy Cocoa Brownies
Course: Nut CookiesCuisine: AmericanDifficulty: Easy12
brownies5
minutes30
minutes200
kcalQuick homemade cocoa brownies with buttery edges, moist chocolate centers, and optional crunchy walnuts.
Ingredients
1 cup granulated sugar
½ cup unsalted butter, melted
2 large eggs
½ cup self-rising flour
⅓ cup unsweetened Dutch-processed cocoa powder
¼ tsp salt
1 tsp vanilla extract
½ cup walnuts, chopped (Optional)
Directions
- Preheat the oven. Heat the oven to 175°C / 350°F. Grease and lightly flour an 8-inch or 9-inch square baking pan.
- Mix the wet ingredients. Whisk the sugar and melted butter together in a medium bowl until thoroughly combined. Add the eggs and whisk until the mixture looks smooth and slightly glossy.
- Add the dry ingredients. In a separate bowl, combine the self-rising flour, cocoa powder, and salt. Fold the dry mixture into the wet ingredients just until no obvious streaks of flour remain.
- Finish the batter. Stir in the vanilla. Fold in the chopped walnuts, if using. Avoid excessive mixing once the flour has been incorporated.
- Fill the pan. Spread the batter evenly in the prepared baking pan, making sure it reaches the corners.
- Bake. Bake at 175°C / 350°F for 25-30 minutes, until the edges are set and the center is cooked but still moist. Avoid waiting for the center to become completely dry.
- Cool and slice. Let the brownies cool in the pan before cutting into 12 squares. Cooling gives the crumb time to set and produces cleaner slices.